Lapel Pin Manufacturing: Die Struck vs Die Cast vs Printed
The choice between die struck, die cast and printed lapel pins is usually settled by one line in the artwork: whether the design has a photograph in it, and whether it has anything standing up off the surface. Those two questions eliminate a process each. Everything else — colour count, size, finish, fitting — is a refinement on a decision that is already made.
Here is what each process does, what it cannot do, and the checks that keep a 1,000-piece order from arriving with a detail that was never in the die.
Die struck: a hardened die and a brass sheet
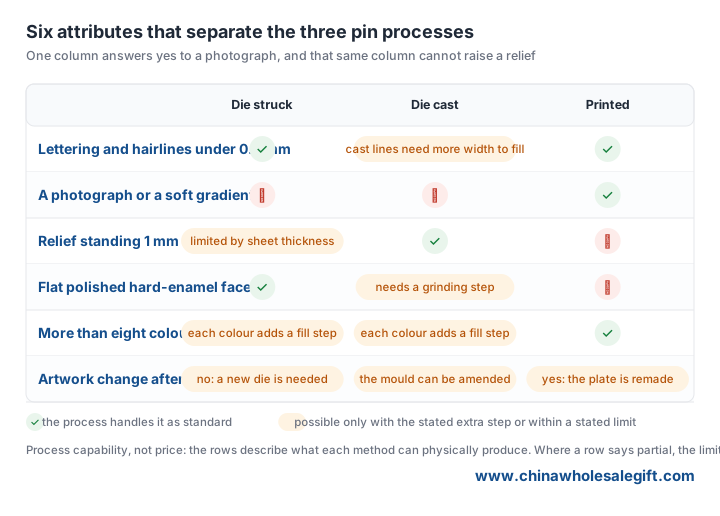
Struck pins are cut from a brass sheet, typically around 1.0 to 1.2 mm thick, and formed by pressing that sheet between a hardened steel die and its counterpart. The metal moves rather than being removed, so detail is raised or recessed by the die itself and the pin comes out with a crisp edge. Fine lettering and hairlines down to roughly 0.4 mm reproduce reliably, which is why struck pins are the default for crests, seals and any design with small type.
The constraint is the sheet. Relief can only stand as high as the metal can be persuaded to flow, so a design that wants a 2 mm three-dimensional figure is fighting the process. Struck pins are also the process where a late change costs most: correcting a misspelled word after the die is cut means a new die, and no amount of goodwill from the factory changes that.
Struck pins take enamel well. Soft enamel fills the recesses and leaves a slight ridge at each colour edge, which reads as texture; hard enamel is filled and then ground and polished flat, producing a smooth face with colour flush to the metal lines. The hard-enamel step adds handling and rejects, and it is the difference most people mean when they say a pin feels expensive.
Die cast: shape freedom and deeper relief
Casting pours molten zinc alloy into a mould, so the shape comes out of the cavity rather than out of the sheet. That allows undercuts, thick bodies and relief well above what a struck sheet can hold, and it allows a design whose outline would be impractical to cut. Minimum detail is coarser than striking — a cast line needs more width to fill cleanly — so a cast pin with 0.4 mm lettering is a specification the mould cannot honour.
Casting is also the process that tolerates a design change best before the mould is made, and the one that most often surprises buyers on weight. A cast body can be noticeably heavier than a struck one at the same diameter, which some wearers read as quality and others read as a pin that drags a shirt collar down.
Finishing a cast pin usually includes polishing before plating, because the casting skin is not smooth enough to plate over directly. Ask whether that polishing is included in the quoted step; a cast pin that skipped it shows a dull face under the plating that no colour fill hides.

Printed: the only process that reproduces a photograph
Printing puts the artwork onto a flat metal blank by offset, then covers it with a dome of epoxy. Colour count stops being a cost driver, gradients and photographs reproduce, and small type is limited by print resolution rather than by metal flow. For a campaign pin carrying a photograph, a sponsor logo with a soft gradient, or more than eight colours, printing is the only realistic route.
What it gives up is relief and the metal edge. The dome adds a convex surface that catches light and can yellow with UV exposure, and the print sits under that dome rather than in the metal, so a scratched dome is visible in a way a scratched enamel face is not. The blank is usually thinner than a struck pin, which is why printed pins feel lighter in the hand.
Finishes and fittings decide how it reads
Three finish decisions matter more than the artwork. The first is plating: gold, nickel, brass, black nickel and dyed finishes all change the perceived value, and on a pin that touches skin, nickel release is regulated at 0.5 micrograms per square centimetre per week under EN 1811. If the pin is a gift for children, the metal content rules tighten further.
The second is the colour fill method: soft enamel leaves ridges, hard enamel is polished flat, and epoxy coating over either adds gloss and a layer of protection. The third is the fitting. A butterfly clutch is the default and the cheapest; a deluxe clutch with a longer post holds a thicker garment; a magnet leaves no hole in fabric and is the safer choice for a silk scarf or a jersey. A rubber clutch is the one that comes off in a washing machine and takes the pin with it.
Whatever the fitting, ask for the post to be welded or cast in one piece with the body rather than soldered. A soldered post is the failure point in every pin that has come apart in a wearer's hand.
Brief the process, not the picture
A brief that says "gold pin, 25 mm, logo" will produce three different pins from three suppliers. Write the process, the sheet or body thickness, the minimum line width, the plating, the enamel type and the fitting, then attach the artwork as vector with the smallest detail called out and dimensioned. State the colour reference for each fill as a Pantone number rather than "dark blue".
On the sample, check four things: measure the smallest letter with a caliper and confirm it matches the drawing; look at the colour boundary under a loupe for bleed between fills; flex the pin slightly and watch the post, which should not move independently of the body; and rub the plated edge with a soft cloth to see whether the plating is thin at the burr. Approve the sample by signing the back of it with a date, keep it, and compare the production run to that signed piece rather than to a photograph. The lapel pins category shows the range of formats these decisions cover.
Sourcing business gifts for your team?
Send your brief and quantity for a quote and a digital proof.
Get a free quote


