Sample Approval Flow: 5 Stages Before Mass Production
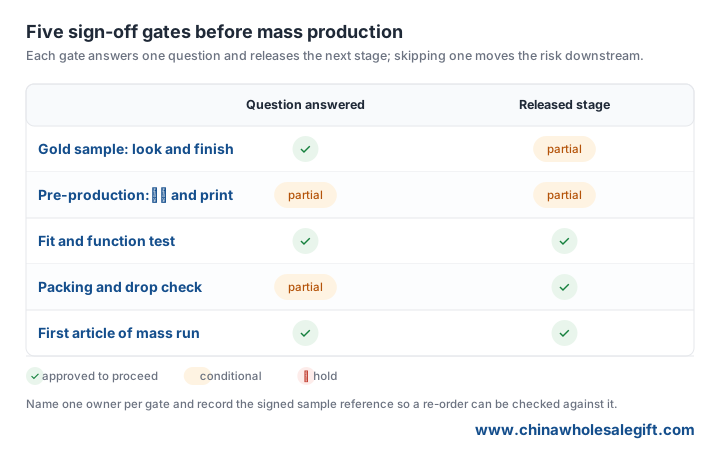
Most bulk-order disputes trace back to an approval that was never clearly signed. A buyer says the colour is wrong; the supplier says it matched the sample. Both can be telling the truth because different things were approved at different points and nobody wrote down which. A defined sample-approval flow fixes that: five gates, each answering one question and releasing the next stage. This guide walks through the sequence from gold sample to first article of the mass run, with the question to ask and the record to keep at each step. It applies to watches, pins, bags and most custom gift categories where tooling and print are committed before the main order runs.
1. Gate One: the Gold Sample
The gold sample is the reference the whole order is judged against: the approved look, finish, logo and materials of the item. Sign it only when the colour, surface, print placement and overall feel match what you intend to sell or give. Ask the supplier to label and date it, keep one signed copy on each side, and photograph it from several angles with a colour note. Do not treat the gold sample as proof that production will be identical - it proves the target, not the process. A common error is approving a sample made by hand on better material than the bulk run will use. Ask whether the sample was made on the production line or by a sample workshop, and if it was the latter, request a pre-production sample before tooling is committed.
2. Gate Two: Pre-Production Materials and Print
Once the target is fixed, the second gate checks that the actual materials, coatings and print method can hit it. This is where you catch a plating that reads warmer than the gold sample or a fabric that takes ink differently. Ask for a print pull or a small run on the real substrate, not a digital proof. Confirm the material grades and colours in writing, and check any coating against the finish you signed. For a mixed programme with several SKUs, approve one sample per material and colour combination rather than assuming a result transfers. If a material has to change to meet a budget, reopen gate one: a substitution that saves a few cents can shift the colour or weight enough to fail the original approval. Log every change so the final spec tells a coherent story.

3. Gate Three: Fit and Function
Appearance approved, the third gate asks whether the item works. For a watch, that means the movement keeps time and the buckle holds; for a bag, that zips run and straps take a load; for an electronic gift, that the unit powers on and charges to spec. Define a small, repeatable test rather than a vague impression: a time check over 24 hours, a set number of zip cycles, a measured charge. Write the pass criterion into the approval record so it is not argued later. This gate matters especially where function is invisible in a photo. A piece can look exactly like the gold sample and still fail in the hand. Test several units, not one, because a single good piece can hide a process that is out of control.
4. Gate Four: Packing and Transit
A correct product in a bad carton still arrives as a claim. The fourth gate approves the pack: the insert that holds the item, the carton strength, the way pieces separate, and the markings on the outer box. Ask for a packed sample and run a drop test at the height the shipment will realistically see. Check that printed gift boxes protect the corners, that nothing rubs against a finished surface, and that mixed SKUs are counted correctly. Confirm the carton dimensions and packed weight, because these drive freight cost and may change the landed quote you agreed. If the goods ship by air, check that any battery or liquid content is declared on the pack in line with the carrier rules. Sign the pack spec as its own item so a later re-order does not quietly switch to a cheaper insert.
5. Gate Five: First Article of the Mass Run
The last gate is the first finished piece off the production line, often called the first article. Compare it directly against the signed gold sample and the gate-two material notes, not against a photo on a screen. Check the same attributes you signed at each earlier gate: colour, finish, print placement, function and pack. If it matches, sign it and record the batch number so the bulk run has a reference. If it does not, stop the line before more units are made; a correction at this point costs far less than a rework after the run. Agree in advance what happens if the first article fails - a pause, a re-sample, a revised target - so the decision is not improvised under shipping pressure.
6. Making the Flow Stick
A flow works only if each gate has an owner and a record. Give one person on your side the authority to sign, and ask the supplier to name their counterpart. Keep a single folder with the signed gold sample photos, the material and print approvals, the function-test results, the pack sign-off and the first-article record, all tied to one spec revision. When a change is proposed, note which gate it reopens and get that gate re-signed. This discipline is what lets a re-order six months later match the first shipment instead of drifting. If you are placing a first order with a supplier, ask them to walk you through their own approval flow before you send artwork. Send us your product type, quantity and destination and we will share the sample and approval schedule we would run for your programme.
Sourcing business gifts for your team?
Send your brief and quantity for a quote and a digital proof.
Get a free quote


